EDUARDO MARTINELLI
UNITY & C#
EXPERT DEVELOPER
Labelling Tectonic Plates — Building a Reusable World-Space Naming System in Unity
By Eduardo Martinelli | April 05, 2026 | 0 min read
In this devlog, we assign names to each tectonic plate and build a reusable world-space labelling system to display them on the planet's surface.
Colors are useful. Names are better. So the next step was to label each plate — something like what you'd see in a game of Risk, where regions have identities rather than just tints.
What we'll cover:
- Building a reusable
NameGeneratorstatic class - Creating a
RegionMappingdata class to own plate names, colors and positions - A brief architecture detour that cost four hours
- Building the world-space UI to display the names on the planet
A Static Name Generator
Let's start building a static NameGenerator class. This class will be used to generate names for our plate tectonics, but also any other names we may want in the future. It shall store all the logic needed to build these names.
I use global classes sparingly, but this was a case that earned it: there are many managers in the game — tectonics, temperature, humidity — and many of them will eventually need to generate names.
If each one handled it themselves it would bloat every manager. A single globally accessible class keeps them lean and separates the concern cleanly.
This is also acceptable because a name generator isn't directly part of the gameplay nor holds crucial game state.
The shared logic (getting a random name, getting a unique name) lives directly on NameGenerator so future name classes can reuse it without duplicating code. TectonicPlates is just one of those classes:
public static class NameGenerator
{
    // The functions below are to be reused for future name classes
    // That is the reason why they are directly below NameGenerator instead of the TectonicPlates class
    private static readonly Random _rng = new Random();

    private static string GetRandom(string[] names)
        => names[_rng.Next(names.Length)];

    private static string GetUnique(string[] names, HashSet<string> used)
    {
        if (used.Count >= names.Length)
            throw new InvalidOperationException(
                "No more unique names available.");

        string name;
        do { name = GetRandom(names); }
        while (used.Contains(name));

        used.Add(name);
        return name;
    }

    // Stores the possible names for our tectonic plates
    // Utilize the parent methods to avoid code duplication in future name classes
    public static class TectonicPlates
    {
        private static readonly string[] _names =
        {
            "Pangea", "Laurasia", "Gondwana", "Rodinia",
            "Pannotia", "Columbia", "Kenorland", "Nuna",
            "Ur", "Vaalbara", "Arctica", "Atlantica", "Euramerica"
        };

        private static readonly HashSet<string> _used = new();

        public static string GetRandomName()  => GetRandom(_names);
        public static string GetUniqueName() => GetUnique(_names, _used);
        public static void Reset() => _used.Clear();
    }
}
Where Should the Name Data Live?
Now we can generate names. But where should they be stored?
Your first instinct might be to drop them into the existing tectonic data class. I thought the same. But plate names have no value to plate generation itself — the simulation doesn't care what a plate is called. Stuffing names into TectonicsMapping would bloat it with data it has no business owning.
So instead we create a dedicated RegionMapping class. It holds everything the UI needs to draw a named region: a label, a position on the board, and a color. Each of these gets bundled into a RegionData object:
public class RegionData
{
    public string Name;
    public Vector3 Position;
    public Vector3[] AllCoords;
    public Color Color;
}
RegionMapping is queryable by layer, so when we add more named regions in the future — geological features, territories, in-game events — they all slot into the same structure without touching any other class.
For each dataset that needs transformation we add it to our class. SetPlateRegions takes the raw plate coordinates and transforms them into RegionData objects with names, colors and positions.
If we later want to add, for example, named mountain ranges, we can add a SetMountainRegions method that transforms mountain data into the same RegionData format without affecting anything else.
public class RegionMapping : MonoBehaviour
{
    private SerializedDictionary<PlanetLayer, RegionData[]> _layerToRegion;
    public RegionData[] GetRegionData(PlanetLayer layer) { return _layerToRegion[layer]; }

    public void Setup(Dictionary<Vector3, List<Vector3>> plateToCoords)
    {
        _layerToRegion = new SerializedDictionary<PlanetLayer, RegionData[]>();
        SetPlateRegions(plateToCoords);
    }

    private void SetPlateRegions(Dictionary<Vector3, List<Vector3>> plateToCoords)
    {
        NameGenerator.TectonicPlates.Reset();

        int plateQtd = plateToCoords.Keys.Count;
        Vector3[] allPlates = plateToCoords.Keys.ToArray();
        _layerToRegion[PlanetLayer.PlateTectonics] = new RegionData[plateQtd];

        for (int i = 0; i < plateQtd; i++)
        {
            string name;
            try
            {
                name = NameGenerator.TectonicPlates.GetUniqueName();
            }
            catch (InvalidOperationException)
            {
                GlobalLogger.Instance?.Warning(
                    $"[Tectonics] More plates ({plateToCoords.Count}) than unique names. Reusing names.");
                name = NameGenerator.TectonicPlates.GetRandomName();
            }

            _layerToRegion[PlanetLayer.PlateTectonics][i] = new RegionData()
            {
                Name = name,
                Color = Color.HSVToRGB((float)i / plateQtd, 0.5f, 0.95f),
                Position = allPlates[i]
            };
        }
    }
}
We can already verify this is working before touching the UI. I like to use a plugin called SerializedDictionaries from AYellowPaper. I switch my Dictionary to a SerializedDictionary for some quick debugging.
The region data is then visible directly in the inspector:
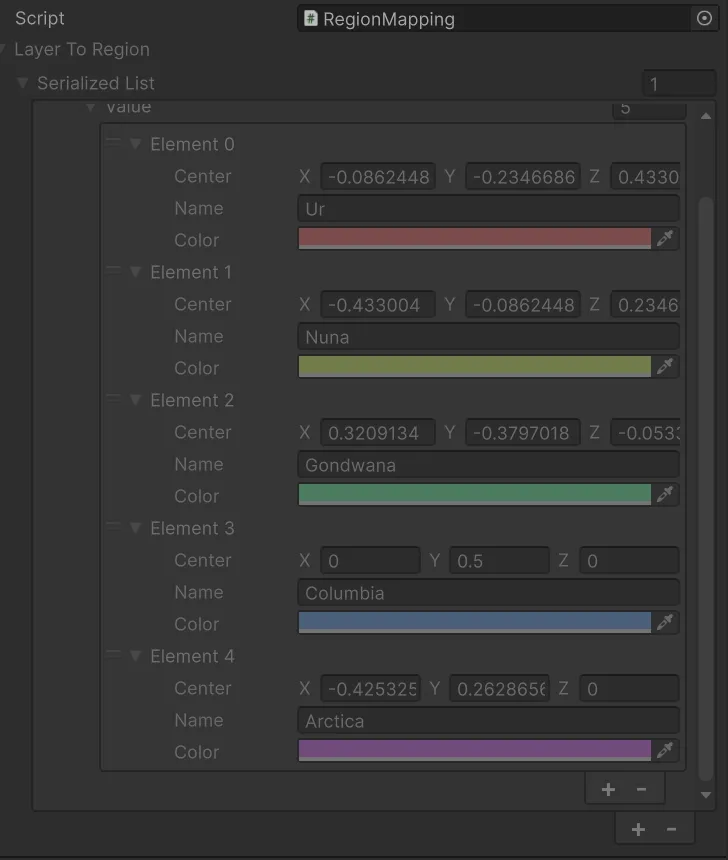
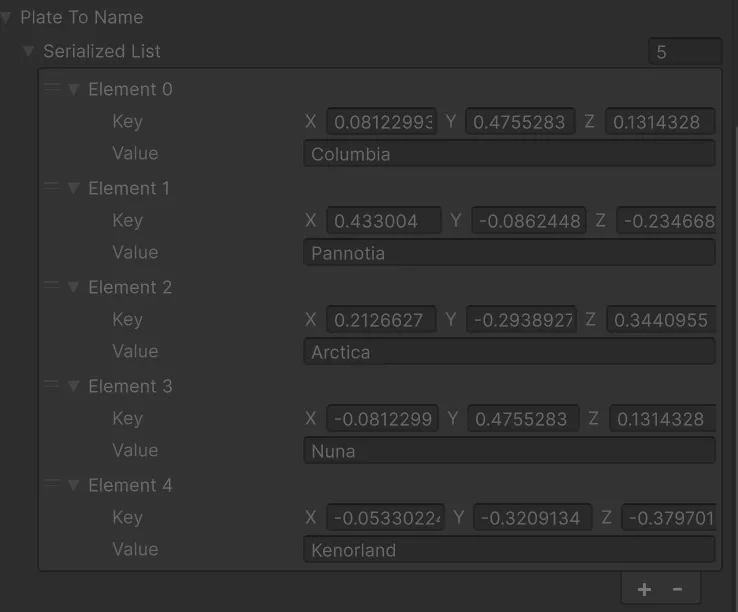
Names are assigned, colors are set, positions are stored. Now we need to draw them.
An Architecture Detour (The Not So Fun Stuff)
Before building the UI I noticed a significant issue in how UIManager was structured. The UI layer logic and the planet layer logic were sharing a partial class in a way that made it hard to reason about who owned what. Connecting RegionMapping to the UI made this impossible to ignore.
I spent about four hours splitting things up — separating the partial class into two proper classes and clarifying how matches in different game modes get initialized. Not glamorous. But the result is more clarity between classes and cleaner control over setup order. This was the only time I found partial classes useful and it will most likely the last time I will be using them.
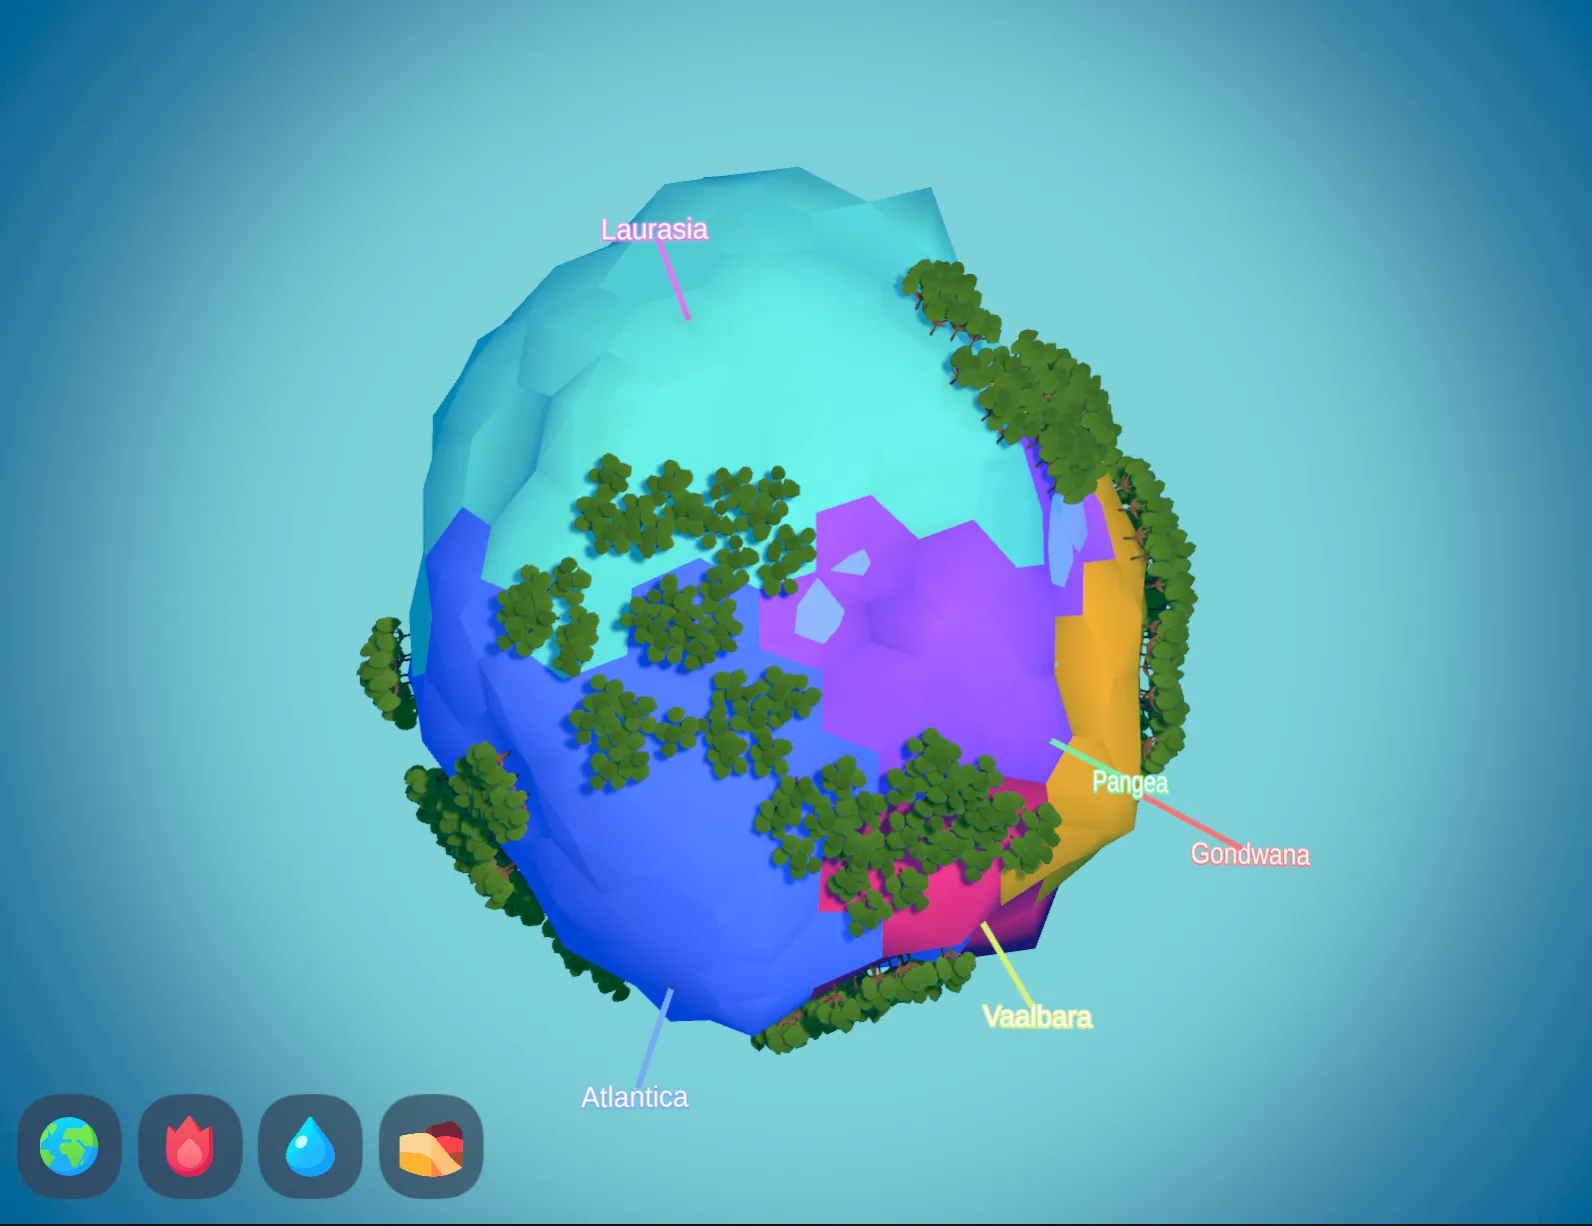
Putting the Names on Screen
With the data in place, the UI side has all it needs to render the names generated. We start by making a mockup directly in the scene — pressing play, looking at the generated planet, and sketching out how the labels should look:
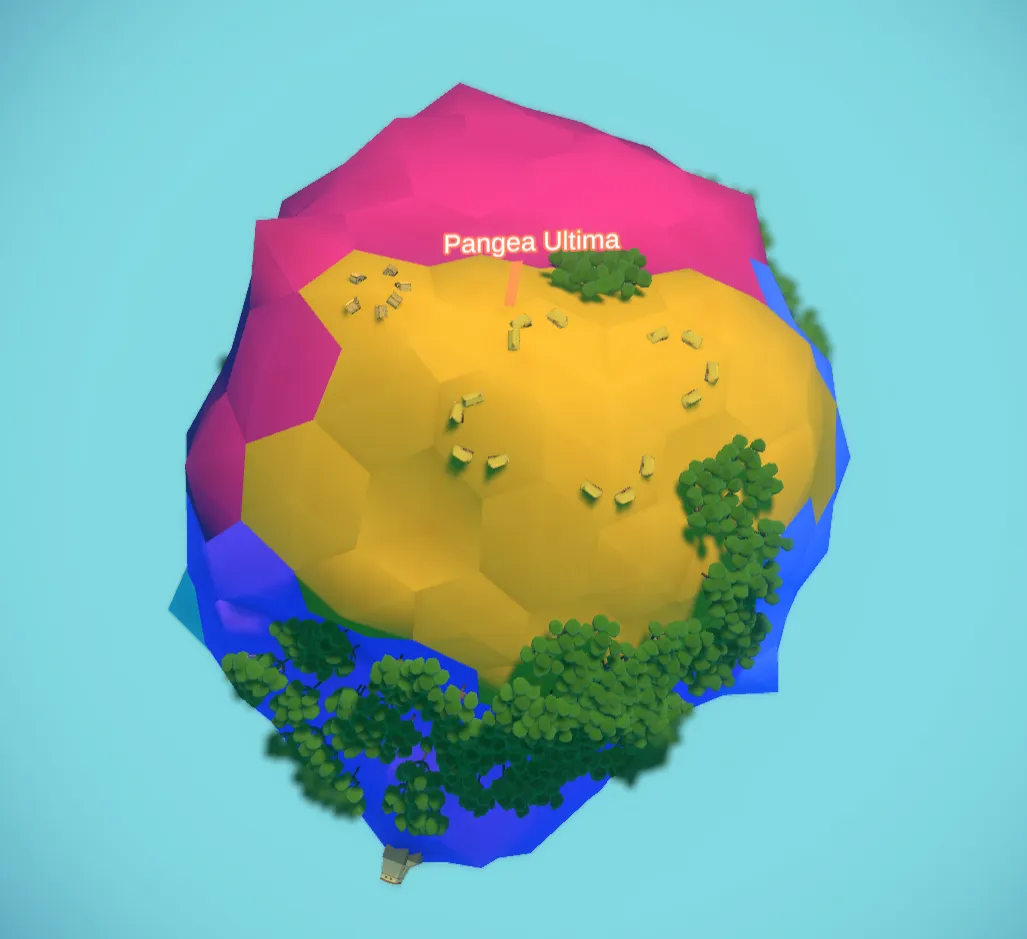
Colored text with a LineRenderer shooting down to the surface. Simple, readable.
I have a simple method to implement dynamic UI classes. I start with a parent class "UISomething" and then implement a child class "UISomethingGUI" that has the actual UI components. The parent class is responsible for pooling and managing the child GUIs, while the child class is responsible for rendering the data and binding to triggers in-game.
From here the UIRegionGUI component is built directly around what the mockup uses:
public class UIRegionGUI : MonoBehaviour
{
    [SerializeField] private TextMeshProUGUI _text;
    [SerializeField] private LineRenderer _line;

    public void Setup(Transform tile, string text, Color color)
    {
        _text.text = text;
        _line.startColor = _line.endColor = color;
        transform.position = tile.position;
        _line.positionCount = 2;
        _line.SetPosition(0, tile.position);
        _line.SetPosition(1, tile.position + tile.up * 0.9f);
        _text.transform.position = tile.position + tile.up;
    }
}
Whenever a new layer is triggered, the data is read, and a new GUI is set up. It's text, color and line position are all driven by the RegionData we set up earlier.
Its parent class UIRegions pools these elements and renders them on demand per layer. When the player toggles the tectonics layer, RenderNames() is called, the pool spawns the right number of GUIs, and each one is wired up to its RegionData. Switching layers or turning the toggle off calls Clear(), which returns everything to the pool.
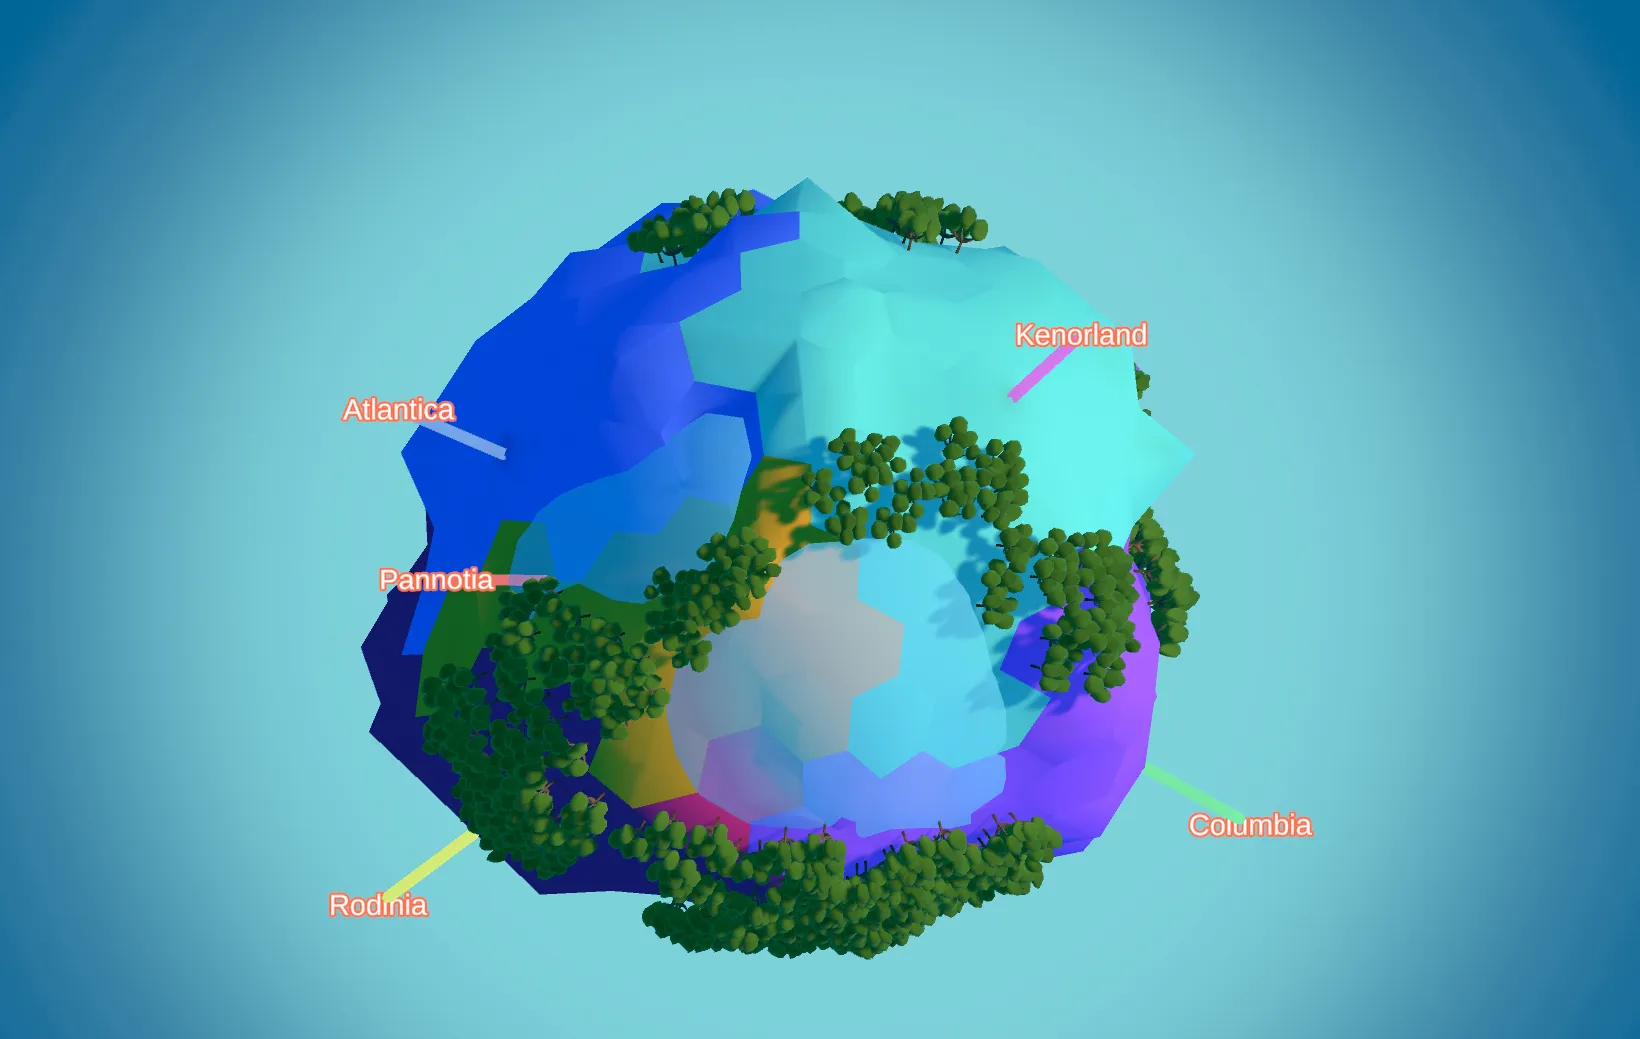
After hooking this up through the manager hierarchy — passing the necessary functions down without creating direct dependencies — this is what it looks like early on:
Two small but necessary fixex:
- The text needs to always face the camera or it becomes unreadable the moment you rotate the view. A quick billboard constraint on the Y axis handles this.
- The colors of the text does not match our region colors. Easy fix in our Setup method.
At last let's make sure the layer colors match the label colors. Some databinding makes sure the colors are consistent across the board:
There are still rough edges. The water shader occasionally renders above the text. Label positions can look random because the plate generator doesn't guarantee the seed coordinate lands anywhere near the plate's visual center. But for now, clicking the tectonics layer shades each plate and labels it by name. It's one of those features that makes the simulation feel like a real place in a way raw data never quite does.
What Could be Next
- Fix label positions so they land closer to the actual visual center of each plate
- Fix label rotation so it doesn't rely on the Y axis solely
- Use the same region system to subdivide the planet into smaller territories
- First pass at actual gameplay: conquering regions, Risk-style
If you found this useful, consider following along for future devlogs — I'm documenting the fun and not so fun stuff I deal with in my spare time.